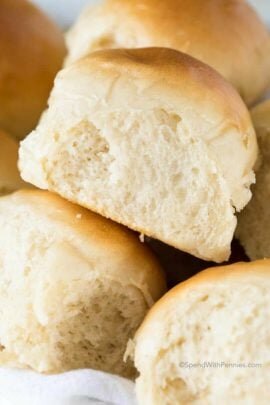
Anyone (including you) can make perfectly fluffy homemade biscuits from scratch!
This biscuit recipe is easy to make and I’ve included my best tips to ensure that your biscuits are tender and flaky every time!
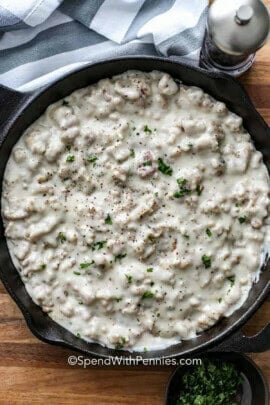
Biscuits aren’t just for breakfast; serve them with meals like chicken stew, sausage gravy, or bacon gravy. They’re perfect for dipping and sopping up sauces of all kinds.

Ingredients for Biscuits
This homemade biscuit recipe is a quick recipe which means no waiting around for the dough to rise. Leavening (the rise of the biscuits) comes from both baking soda and baking powder as well as the way the dough is prepared. They’re light, fluffy and buttery delicious.
- Flour: All purpose flour is the base of these biscuits.
- Baking Powder & Baking Soda: Together, these give your biscuits their rise and help them to brown. Ensure that your ingredients are fresh for the best rise.
- Sugar: Just a touch to balance flavors.
- Kosher Salt: Adds flavor, if you only have table salt, use a bit less.
- Cold Butter: Provides richness and flakiness. Coldness is key, so those butter bits remain intact creating flaky layers.
- Milk: Binds everything together.
Got buttermilk? Find our favorite buttermilk biscuits recipe here.

How to Make Biscuits
- Cut butter into the dry ingredients (per the recipe below).
- Mix in the milk and gently knead just a couple of times.
- Roll out and cut into rounds (or pat into a rectangle and cut into squares).
- Bake and serve warm with butter.
How to Make Flaky Biscuits
Use very cold butter and cut it in into the dry ingredients before adding liquid, the little pockets of butter create lift and flaky layers.
Use a pastry cutter if you have one or a sturdy fork. You could also pulse a few times in your food processor with the dough blade. You don’t want to incorporate the butter completely, it should be about the size of peas.


Don’t overdo the kneading. Unlike yeast bread, you don’t want to overdevelop the gluten in the flour. The best biscuits are so tender they practically melt in your mouth, so be sure not to overwork the biscuit dough.
Avoid twisting the cutter. When using a biscuit cutter, avoid twisting it or it will seal the edges and they won’t bake up nice and flaky. Use a sharp cutter, the blunt edge of a glass will also keep the biscuits from rising nicely.
Brush with milk. Brush the tops with milk or cream before baking for a golden brown top.
How to Store Leftovers
Homemade biscuits are easy to store. Depending on how long you want to keep them you can leave them on the counter, in the fridge, or store in the freezer!
- Room Temperature: They’ll keep a few days at room temperature in an airtight container.
- Fridge: Store in a baggie in the fridge for up to a week.
- Freezer: Freeze leftover biscuits for up to 4 months. Store in freezer bags.
How to Reheat Homemade Biscuits
Homemade biscuits taste best served warm. They can go straight from freezer to oven or microwave without thawing first.
- Place on a cookie sheet in the toaster oven set at 350°F for 5 -10 minutes.
- Float a piece of foil on the top to prevent over-browning or burning.
Now bring on the butter and jelly and let’s eat some biscuits!
What to Serve with Biscuits
Sweet or savory, these biscuits pair perfectly with any meal or enjoy them with your favorite jams or jelly.


Whipped Strawberry Butter

Strawberry Freezer Jam
Did you enjoy these Homemade Biscuits? Be sure to leave a rating and a comment below!


Homemade Biscuits

Ingredients
- 2 cups all-purpose flour
- 4 teaspoons baking powder
- ¼ teaspoon baking soda
- 1 teaspoon granulated sugar
- ½ teaspoon kosher salt
- ⅓ cup butter cold and cut into small cubes
- ¾ cup milk or as needed
Instructions
-
Preheat the oven to 450°F.
-
In a large mixing bowl, whisk together the flour, baking powder, baking soda, sugar, and salt.
-
Add the cold butter cubes to the flour mixture. Using a pastry blender or a fork, cut in the butter in until the butter is about the size of peas.
-
Gradually add the milk into the flour mixture until the dough holds together. It will be very slightly sticky. You may not need all of the milk.
-
Transfer the dough to a lightly floured surface and gently fold the dough over and knead about 10 times or until fairly smooth. If the dough is too sticky dust it with a little bit of flour. If you find the dough too dry, add milk 1 tablespoon at a time.
-
Gently pat the dough to 1-inch thickness. Using a large biscuit cutter, cut biscuits, be sure not to twist the cutter. Place the biscuits on a prepared baking sheet lined with parchment paper.
-
Gently pat out any remaining dough, combining the scraps and repeat the cutting process.
-
Bake for 10-12 minutes or until golden brown.
Notes
- For the flakiest biscuits, ensure the butter is very cold and handle the dough as little as possible.
- Do not twist the cutter or this will seal the edges and the biscuits will not be as flaky.
- Brush the tops with cream or milk if desired, this will help them brown a little bit more.
- Using parchment paper is optional but it makes cleanup a breeze.
- Store leftover biscuits on the counter for up to 3 days in a covered container and in the fridge for up to a week.
Nutrition Information
Nutrition information provided is an estimate and will vary based on cooking methods and brands of ingredients used.
© SpendWithPennies.com. Content and photographs are copyright protected. Sharing of this recipe is both encouraged and appreciated. Copying and/or pasting full recipes to any social media is strictly prohibited. Please view my photo use policy here.


If I use self rising flour, do I need to adjust the baking soda &/or the baking powder? Thanks!
I have only made this as written Michele, so I can’t say for sure.
I made these biscuits once and they were delicious. I plan to make them again. Can I pre make them and bake them the next morning?
I have never tried making these ahead so I can’t say for sure. They do reheat well if you want to bake them ahead of time and then serve them warm.
I am LITERALLY OBSESSED with these and plan on making a bunch and storing them. I was wondering if it was possible to make the dough and freeze the uncooked dough until I’m ready to use it? Or would it be better to cook them first and then freeze them?
I haven’t tried freezing the dough, Kelsey. But the post does give instructions for reheating from frozen after baking. Hope that helps!
made these biscuits
awesome came out so delightful going make more now thank you vest biscuits ever
can I make these with bread flour?
I have only made this recipe as written, Kristi. If you do decide to try it, we would love to hear how it goes!
awesome.. nice and flaky holds up very well with my sausage gravy.. In all great recipe for any meal.
Really yummy!
Will this recipe work with Paleo flour blend?
I haven’t tried this particular recipe with a gluten free flour but it should work well. Just make sure your Paleo flour blend is intended to be used as a 1:1 all purpose substitute.
Very light & flakey biscuits. Made exactly as recipe stated. ❤️WOW. Made these for my hubs bday breakfast. He said it was best he ever had. Definitely a keeper recipe. Thanks.
My favorite thing in life! Thank you
I made this with gluten free flour. It was grreat! Thank you.
I’m so glad to hear that worked out Laura, thank you for sharing!
These are so easy and come out perfect every time I make them! No need to buy refrigerated biscuits when these are so yummy. I even use the little scraps that are left from the cut outs and place them around the pan to make little bites!
Very easy and delicious! Will make them from now on.
Can you freeze the dough while it’s fresh instead of baking then freezing? We love this recipe but it’s always too much for us and would prefer to bake from frozen dough.
We haven’t tried freezing the dough Katie. But the post does give instructions for reheating from frozen. Hope that helps!